Build a Mobile App to Sell Products with Drupal
Category:
 This tutorial describes how to create a website and mobile application to sell physical products. Customers on a desktop or laptop computer will be able to purchase the product through the website, much like a typical e-commerce store.
Once we have built the mobile application, customers who have downloaded and installed the mobile app onto their Android or iOS (iPhone, iPad) device will be able to purchase the product as an In-App Purchase.
For this example website and mobile app, we're going to sell bottles of beer. *Cough* - Please don't actually sell beer without first getting permission from your local Big Brother.
The main 3 sets of tools we will utilize are:
- Drupal
- The website will be powered by Drupal 7
- Drupal Commerce
- The online store will be powered by the Commerce module for Drupal
- DrupalGap
This tutorial was inspired by this Session from DrupalCon Austin 2014. If you're new to any of these tools mentioned above, please watch the video for an introduction. Otherwise, let's get started!
1. Download and Install Drupal 7
2. Download and Install the Commerce Module for Drupal
If you're new to Drupal Commerce, I'd recommend checking out Commerce KickStart for a nice introduction. Otherwise, the Commerce module comes packed with many sub modules. To get started, we'll want to make sure the following modules are enabled on our Drupal site:
- Cart
- Checkout
- Commerce
- Commerce UI
- Customer
- Customer UI
- Line Item
- Line Item UI
- Order
- Order UI
- Payment
- Payment UI
- Price
- Product
- Product Pricing
- Product Pricing UI
- Product Reference
- Product UI
Woah, that was a lot of modules. Pretty much enable them all except for the Tax modules, and don't tell the King about it.
2a. Give users permission to go through the Checkout process
- On the Drupal site, go to: admin/people/permissions
- Next to the "Access checkout" permission, check the box for Anonymous and Authenticated users
- Click the "Save permissions" button
3. Add a Product Type
Go to:
With the following info:
- Name: Beer
- Description: Mmmm, beer.
Then click the "Save and add fields" button.
4. Add a "Size" Field to the Product type
As a bare minimum, we want our customers to be able to choose the size of their beer. So let's add a new field on our Product type to accommodate this:
Under the "Add new field" section, enter the following info:
- Label: Size
- Field type: List (text)
- Widget: Select list
Then click the "Save" button. Next up, in our "Allowed values list" for the field, let's copy/paste these values:
Then click the "Save" button. Next, specify these values:
- Label: Size
- Required field: Check the box
- Default value: Pint
- Enable this field to function as an attribute field on Add to Cart forms: Check this box
- Number of values: 1
Then click the "Save settings" button.
5. Add some Products
We're now ready to add some products to sell. In Drupal, go to:
Then enter the following values:
- Product SKU: bells-oberon-12-oz
- Title: Bells Oberon 12 oz
- Price: $4.00
- Size: 12 oz
Click the "Save and add another" button, then enter the following values:
- Product SKU: bells-oberon-pint
- Title: Bells Oberon Pint
- Price: $5.00
- Size: Pint
As you can see we've now created 2 products which allow us to sell a Bells Oberon beer in either a 12 oz or pint size.
Repeat this procedure as many times as you want to build your beer catalog. After a while, we'll have a list of beer like so:
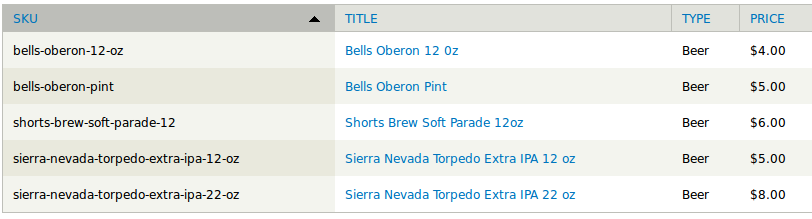
For now, prohibition is tough on the Internet so we only have 5 products to sell, within 3 types of beer.
- Bells Oberon
- Shorts Brew Soft Parade
- Sierra Nevada Torpedo Extra IPA
6. Add a Content Type to Display the Products
In Drupal, go to:
Enter Beer as the Name, then click the "Save and add fields" button.
6a. Add a Field to Reference the Products
Then under the "Add new field" section, enter the following info:
- Label: Beer Products
- Field type: Product reference
- Widget: Check boxes/radio buttons
Then click the "Save" button, then click the "Save field settings" button. Next, specify these values:
- Label: Beer Products
- Required field: Check the box
- Products types that can be referenced: Beer
- Default value: Pint
- Number of values: Unlimited
Then click the "Save settings" button.
6b. Add an Image Field to Show a Picture
If you're not already there, navigate to this page in Drupal:
Under the "Add new field" section, enter the following info:
- Label: Photo
- Field type: Image
- Widget: Image
Then click the "Save" button, then click the "Save field settings" button. Next, specify these values:
- Label: Photo
- Required field: Check the box
Leave all the other settings as the default values provided, then click the "Save settings" button.
7. Create Content to Display Products
Now that we have some beer products created, we need to create some beer content to reference the beer products. This allows the "Add to cart" functionality to work within Drupal Commerce. On your Drupal site, go to:
Enter these values:
- Title: Bells Oberon
- Beer Products:
- bells-oberon-12-oz: Check this box
- bells-oberon-pint: Check this box
- Photo: Upload a picture to use
Click the "Save" button, then repeat that process for the other two types of beer, using these values:
- Title: Sierra Nevada Torpedo Extra IPA
- Beer Products:
- sierra-nevada-torpedo-extra-ipa-12-oz: Check this box
- sierra-nevada-torpedo-extra-ipa-22-oz: Check this box
- Photo: Upload a picture to use
Then one more time with:
- Title: Shorts Brew Soft Parade
- Beer Products:
- shorts-brew-soft-parade-12: Check this box
- Photo: Upload a picture to use
8. Create a Page to Display the Product Content
We'll use Views to make a page to display our Beer content, in Drupal go to:
Enter these values:
- View name: Beers
- Show: Content
- of type: Beer
- sorted by: Title
Next check the "Create a page" box and enter these values (note, the zero used below means display all items):
- Page title: Beers
- Path: beers
- Display format: Table
- Items to display: 0
Then check the "Create a menu link" checkbox and enter these values:
- Menu: Main menu
- Link text: Beers
Then click the "Continue & edit" button.
8a. Display an Image with the Product Listing Page
Now, in the "Fields" section, follow these steps:
- Click the "Add" button
- Enter this keyword in the Search box: photo
- Check the box next to "Content: Photo"
- Click the "Add and configure fields" button
- Uncheck the "Create a label" box
- On the "Image style" select list, choose "Thumbnail (100 x 100)"
- On the "Link image to" select list, choose "Content"
- Click the "Apply" button
- In the "Fields" section, click the down arrow then click the "Rearrange" button
- Grab the handle next to the Photo field, and drag it above the Title field
- Click the "Apply" button
Finally, we can click the "Save" button on our View, then click the "Home" button to go home. We should now see a "Beers" button in our main menu, let's click it to look at our fine selection:

9. Enable a Payment Method
For this tutorial, we'll be using Stripe to accept a demonstration payment.
- Signup (or login) with Stripe
- Download and enable the Commerce Stripe module
- pay close attention to the README with this module to install it properly
- Go to: admin/commerce/config/payment-methods
- Click "enable" on the disabled Stripe payment method rule
- Click "edit" next to the enabled Stripe payment method rule
- Click "edit" next to the Stripe action
- In a separate window, login to Stripe website
- Go to: Your Account -> Account Settings -> API Keys
- Copy the Secret and Publishable test keys from Stripe
- Paste them back into the corresponding text fields in the "Payment Settings" section back on the Drupal site
- Click "Save"
- Flush all of Drupal's caches
10. E-commerce... done!
That's it, we've built a fully functional e-commerce website with Drupal Commerce to sell beer. Customers can now browse the beer on our website, add it to their cart, and complete the checkout process.
Let's now move on to building the mobile application...
11. Enable DrupalGap, Commerce DrupalGap and Commerce DrupalGap Stripe modules in Drupal
Since we'll be using DrupalGap to build the mobile application, let's download and enable the modules we'll need on our Drupal site:
- https://drupal.org/project/drupalgap
- https://drupal.org/project/commerce_drupalgap
- https://drupal.org/project/commerce_drupalgap_stripe
Refer to each module's README file for important installation instructions about their dependencies and setup configurations.
VERY IMPORTANT: At this time of writing this, the Commerce Services module (a dependancy of Commerce DrupalGap) isn't evolved enough to handle permissions properly. So for this to work properly we have to enable certain permissions for anonymous and authenticated users that we wouldn't normally grant, or we have to use user #1 to bypass the permissions. See this issue for more details: https://www.drupal.org/node/1943426
12. Set up the DrupalGap Mobile Application Development Kit
 If you're new to DrupalGap, follow the Hello World guide to get started. For this example, we'll be developing the mobile app in Google Chrome using the Ripple plugin. Once everything is up and running, our app should look similar to the screen shot here.
13. Enable the Address Field, Commerce and Commerce DrupalGap Stripe modules for DrupalGap
Just like Drupal, DrupalGap has contributed modules. We'll need to download and these two modules to our app's modules directory within DrupalGap:
- http://drupalgap.org/project/addressfield
- http://drupalgap.org/project/commerce
- http://drupalgap.org/project/commerce_drupalgap_stripe
Then enable the modules in our settings.js file, for example:
14. Create a Custom DrupalGap Module to Customize the App
Again, just like Drupal, DrupalGap allows us to create our own modules to handle customization. Let'screate a custom module in DrupalGap, so its JavaScript file lives here:
Then enable the module from within the settings.js file:
15. Create a JSON Page URL in Drupal to Retrieve the Beer List
Let the fun begin... first we need to access our beer list via JSON, so we need to setup a URL that will return JSON to us, in Drupal go to:
- Click +Add in the Display section
- Click Page
- Change the Display name to JSON
- Change the Format to JSON Data Document, on This page (override), then click the Apply (this display) button
- Uncheck the Views API mode checkbox, then click the Apply (this display) button
- Under Page Settings, change the Path to beers.json
- Under Fields, change the Label on both fields, so the first character in the label is lower case, on this display only
- Next to Fields, click the Add button
- Enter nid into the Search box
- Check the box next to Content: Nid and then press the Apply (this display) button
- Change the Label to nid and then press the Apply (this display) button
Now if we preview our results, we should see something like this:
Click the "Save" button to save the View. We're now ready to consume our beer as JSON, be sure to eat some food before consuming beer, and after I suppose.
16. Create a Page in the App to Display the Beer List
Since we created a custom module in DrupalGap earlier, we can use the my_module.js file to create a custom page using hook_menu(), like so:
Then if we set this newly created page as our App's front page in the settings.js file:
We'll be able to see our beer list!
17. Let's Go Shopping for Beer!
 Since DrupalGap comes with the ability to view nodes, and we chose to render our beer list with each item as a clickable link to its node page (e.g. node/123), we can click on an item in our beer list to view it. Since it is 9:30 AM at the time of writing this paragraph, I won't actually drink a beer, but if I had to choose, I'd click on the Oberon for now.
Now that we're viewing the beer node, we can see that our "Add to Cart" form and picture of the beer were automatically rendered for us, neat-o. If we were to scroll down in the app, we could see the whole picture, but you get the idea. Since its early, let's select a 12 0z instead of a pint, and click the add to cart button.
Then we can proceed through the checkout process, which is similar to most e-commerce workflows:


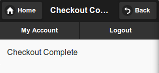
18. All Done!
Now if we were to look in the admin order section in Drupal:
We would see our new order sitting there with a status of pending:
Hello Anshul,
ReplyDeleteIt's a nice article on Build a Mobile App to Sell Products with Drupal with step by step process Detail Explainations.Thank you Sharing the Post.
Mobile App Development Company in hyderabad
Nice Article Build a Mobile App to Sell Products with Drupal
ReplyDeletedrupal commerce website
Drupal Commerce Services
The Article on Mobile testing Services is awesome nice description, thanks for sharing the information about it.Mobile app testing Services and load testing services.
ReplyDelete